
We all know that when it comes to sending professional or informal and non-work-related emails, Gmail is the most favored platform for this. It is the most preferred email provider for both big and small businesses and the customers and other users as well. Now, if you own a business, you ought to have your signature in Gmail. Regardless of how big or small, your business is, having your own Gmail signature not only validates your business entity but also makes you look credible and more professional.
Related: A Guide To Customize The Windows 10 Context Menu.
For those who are new to this, email signature in Gmail is a few lines added at the end of the written email stating the name of the business, its owner, business address and contact details. One might add/remove these details accordingly. Hence, you can add or remove multiple signatures in Gmail accordingly. Gmail also gives its users the flexibility to change or have multiple signatures according to the needs or different situations depending on where it is being sent to.
Why Should You Add Multiple Signatures In Gmail?
Adding multiple signatures in Gmail can turn out to be extremely helpful if you are a business owner as it saves a lot of time. Instead of writing manually you just need to add your template and you are good to go. Even if you do not own a business, then adding your Gmail signature by the end of the mail gives you credibility and adds a certain level of professionalism and authority not only to the body of the email but to you too.
Google has added the option of multiple signatures by default, therefore it is easy for you to look out and discover the feature. If you have already used Microsoft outlook, you would know how it offers the option of multiple signatures and any of them could be added depending on the situation. Similarly, Gmail also offers this feature but the different part is that you have to go through the settings to activate the Gmail extension called templates. And as soon as this feature is activated on your profile, you will have the option of adding multiple signatures according to your need or the need of the article.
How To Add templates To Your Gmail Account?

Courtesy: Mailsignatures.com
Before we get on to adding multiple signatures in Gmail, let us first learn about how to add templates to your Gmail account.
- Log in to your Gmail account.
- Go to settings situated on the top right corner of the Gmail account window.
- On the right-hand side of the Settings window, the ‘Advance’ tab is located. Tap on it.
- In the drop-down menu, you will find the ‘Templates’ option with two choices: Enable or disable. Click on the enable option.
- Once you have made your choice and clicked on enabled, save the new changes you have made.
Related: Create Amazing GIF: 6 Apps That Will Help You.
How To Create Your Signature In Gmail?
Now that we have known about creating templates, let us have a look at creating your signature on your Gmail account. In a Gmail digital signature, you can add your name, contact details, pictures, links, etc. Here is a quick guide on creating one:
- Open and log in to your Gmail account.
- Click on the Settings option in the top right corner.
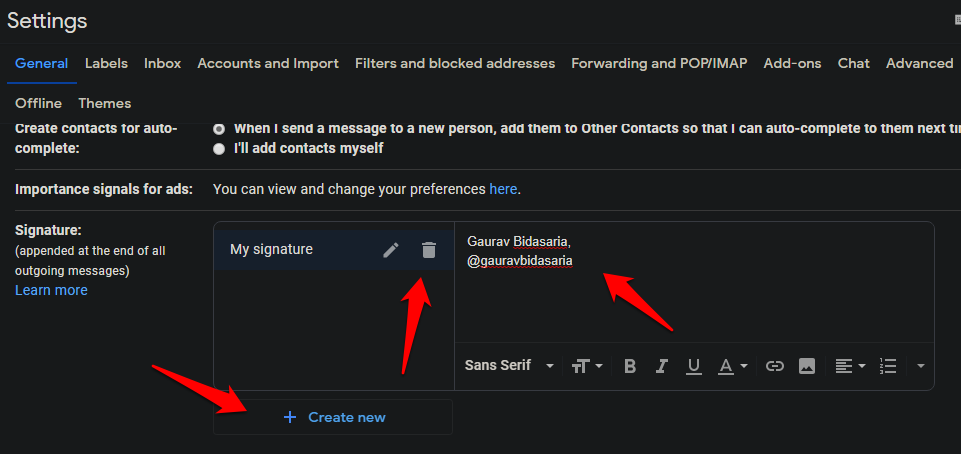
- Under the General tab option, scroll to the signature option and click on ‘New.’
- After you create your signature, name it and click on the create option. Naming signature means providing a heading for your signature when it appears in the options to add among your other signatures. You can name it ‘personal’ or ‘business’.
- Add the signature text on the textbox present on the right side.
- You can also make use of the format bar to make it attractive and catchy by adding colors, images, etc.
- Save changes.
How To Add Multiple Signatures In Gmail?
Creating and adding multiple signatures in Gmail is very easy. Let us look at the steps on how to add multiple signatures in Gmail.
- Go to Gmail settings.
- Under the General tab, click on the ‘Create new’ option again.
- Name the second Gmail signature like you named the first one. The name should be one the basis of categorization so it is easy for your choice which one to use for which setting.
- Complete your second signature on Gmail by following the similar process you followed in the first one.
- Save changes and you have added another signature to your Gmail account.
You can use another one with a similar method.
Must read: How To Recover A Deleted File From Microsoft Teams?
How To Add A Signature In Gmail?
- Open your Gmail account.
- Click on the compose option.
- Click on insert signature by selecting the pen icon.
- Choose and insert the desired signature at the end of the email.
How To Edit A Signature?
Editing can be done and its method is as easy as creating one. Let’s see how to do it.
- Open Gmail and go to the setting icon.
- Go to the General tab and click on the signature you wish to edit.
- Make changes via the text box provided on the right side.
- Save changes
Here go all the details regarding how to add multiple signatures on Gmail.
Latest Articles