
Google LLC. is an American Company that specializes in internet-based products and services on a multinational scale, founded in the year 1998 by Larry Page and Sergey Brin. It has become the one-stop solution for almost all the queries that people have. It has become highly popular on a global scale with a high reputation for satisfying the users with the exact or related information that they might have been searching for.
All kinds of media like photos, videos, articles, blogs, etc that are open-sourced on the internet can be accessed by the users. These are also the information uploaded by people all around the world, hence, it is a platform to get and share data on a global scale.
In this article, we will focus on how to upload an image or photo to Google such that it can be available to all similar to those found as search results in its images category. There is no direct method to upload a photo on Google, as it just displays all the images from different websites, relevant to the keywords searched by the user.
Although an important point to be noted here is that not all the images or photos from random websites would be displayed. This is one of the factors which is essential to be kept in mind by the user who wants the uploaded photo to appear as a search result, and this is possible only if the image is set to an open to view mode while uploading on a website.
Terms to Upload Photo on Google
Before proceeding with the techniques and knowing how to upload photos to Google, let us understand the essentials of a photo for it to appear on Google.
Public View
Google indexes are used as the platforms to upload images to Google as it cannot be done directly. Some of the commonly used indexes are Google Drive, websites, blogs, and social media. The photos uploaded here and given access to be viewed publicly.
Description
Every photo must have a description that explains the image, its scenario or describes the picture to its best. This is also important as the image would appear when the keywords of the description or the related words are searched on Google.
For example, if the image is about a kid playing in a garden, then the description meaning the same should be added so that it would be displayed when the terms ‘garden’, ‘kid’, ‘child’, ‘playing’, ‘happy’ etc are searched using this search engine.
Tips to Improve Visibility on Searches
Now that we know the basic requirements for an uploaded image to be available on Google, let us check out some steps that would improve its probability as the photo has to compete against millions of similar images on a global scale!
Here are a few tricks that might be the push required for it to appear and stand out amongst the competition.
- The uploaded images must not have any restrictions other than those related copyrights.
- The description should be constructed using strategic keywords with an appropriate name and other details.
- Constant sharing boosts the viewability as it is advantageous according to Google’s algorithm that would try to show only relevant and most shared photos at the top of the search result.
- Another technique is to ensure frequent updates as it increases visibility on being searched.
Methods to Upload Photos to Google
Here are the methods to upload photos to Google:
Using Google Drive for Uploading
Here are the steps to upload a photo on Google using Google Drive:
Step 1
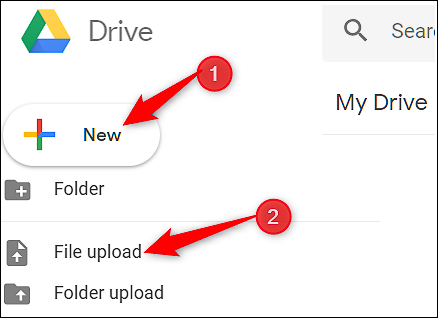
Open Google drive using a web browser. This is the account through which photos can be uploaded.
Step 2
Choose the folder from your device and then upload the photo to the drive. Right-click on the image and choose the ‘Share to all or publicly’ option.
In case this didn’t work out, try choosing the same from the ‘Share with others’ dialogue box by clicking on the share settings icon. This would appear only if the photo is selected. Then go to the ‘Advanced’ menu and check the current status, if it is set to private sharing then click on the ‘Change’ option corresponding to it.
Now choose the ‘On – Public on the web option, which states to be shared publicly, and change the access to the ‘Can View’ mode. Finally, click on the ‘Save’ option and choose the ‘Done’ option to save these changes.
Step 3
Select the photo and open the ‘view details’ option ( i- shaped symbol) on the right corner. Click on the Details tab and from the pane, click on the pen-shaped icon to add a suitable description for the image. Once the keywords are added as the description in the text box that appears, simply press enter to save it.
Using a Website or Blog
To upload a photo to Google, the simplest way is to use it in a website or blog as it will depict the relevance and reach people at the same time. If you do not own a website then search for websites that accept the photographs or start a blog for the same. By this method, Google will automatically add the image to its database.
Here are the steps to upload a photo using a blog account in the Blogger:
Step 1
To add the image, click on the photograph-shaped symbol from the list of icons on the panel above the main page and browse for your photo for uploading. After choosing, click on the ‘Add selected’ option.
Step 2
Click on the inserted image and from the new set of options that appear click on the ‘Properties’ menu.
Step 3
Add the keywords under the ‘Title text’ and ‘Alt text’ space that would be considered as the description for the photo. Click on ‘Ok’. Using the same menu, a caption can also be added. Once the webpage is shared, the image would be indexed for Google searches.
Apart from blogs and websites, social media can be used as an index. For this, the image must be posted and shared on your social media handles such as Twitter, Pinterest, Instagram, and LinkedIn.
In this article, we have covered everything about how to upload photos to Google and the tricks to improve its visibility on a global scale. Hope this was useful to upload photos and use the various Google indexes for the same.
Latest Articles